Tips and tricks
Inspecting native view hierarchy
It's hard to tap on or enter text into a view you don't know how to refer to. In such situation we recommend doing a native view hierarchy dump and finding the properties of the view you want to act on.
Android
First, perform a native view hierarchy dump using adb:
adb shell uiautomator dumpThen, copy the dump file from the device to your machine:
adb pull /sdcard/window_dump.xml .iOS
The easiest way to perform the native view hierarchy dumb on iOS is to use the idb tool.
Once you have idb installed, perform a dump:
idb ui describe-allConfiguring test directory
By default, Patrol looks for tests in the patrol_test/ directory.
This default was changed from integration_test/ to avoid conflicts with Flutter's official integration testing plugin
and to give Patrol tests their own dedicated space. This change was introduced in Patrol 4.0.0.
Using custom test directory
You can configure Patrol to use a different directory by adding test_directory to your pubspec.yaml:
patrol:
  app_name: My App
  test_directory: my_custom_tests  # Custom directory
  android:
    package_name: com.example.myapp
  ios:
    bundle_id: com.example.MyApp
Migrating from integration_test directory
If you have existing Patrol tests in the integration_test/ directory, you have two options:
Option 1: Rename integration_test directory to patrol_test
Option 2: Configure Patrol to use integration_test
patrol:
  app_name: My App
  test_directory: integration_test  # Keep using old directory
  android:
    package_name: com.example.myapp
  ios:
    bundle_id: com.example.MyApp
Non-patrol integration tests should remain in the integration_test directory.
Avoiding hardcoding credentials in tests
It's a bad practice to hardcode data such as emails, usernames, and passwords in test code.
await $(#nameTextField).enterText('Bartek'); // bad!
await $(#passwordTextField).enterText('ny4ncat'); // bad as well!
To fix this, we recommend removing the hardcoded credentials from test code and providing them through the environment:
await $(#nameTextField).enterText(const String.fromEnvironment('USERNAME'));
await $(#passwordTextField).enterText(const String.fromEnvironment('PASSWORD'));
Make sure that you're using
consthere because of issue #55870.
To set USERNAME and PASSWORD, use --dart-define:
patrol test --dart-define 'USERNAME=Bartek' --dart-define 'PASSWORD=ny4ncat'Alternatively you can create a .patrol.env file in your project's root. Comments
are supported using the # symbol and can be inline or on their own line. Here's
an example:
$ cat .patrol.env
# Add your username here
EMAIL=user@example.com
PASSWORD=ny4ncat # The password for the API
Granting sensitive permission through the Settings app
Some particularly sensitive permissions (such as access to background location or controlling the Do Not Disturb feature) cannot be requested in the permission dialog like most of the common permissions. Instead, you have to ask the user to go to the Settings app and grant your app the permission you need.
Testing such flows is not as simple as simply granting normal permission, but it's totally possible with Patrol.
Below we present you with a snippet that will make the built-in Camera app have access to the Do Not Disturb feature on Android. Let's assume that the Settings app on the device we want to run the tests on looks like this:
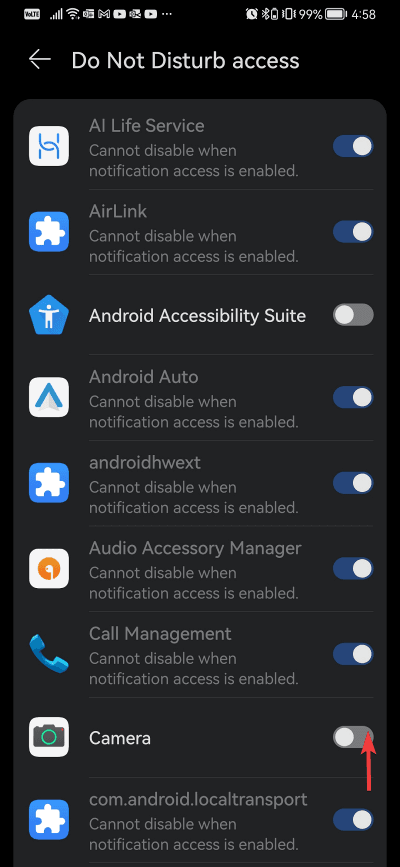
And here's the code:
await $.platform.mobile.tap(Selector(text: 'Camera')); // tap on the list tile
await $.platform.mobile.tap(Selector(text: 'ALLOW')); // handle the confirmation dialog
await $.platform.mobile.pressBack(); // go back to the app under test
Please note that the UI of the Settings app differs across operating systems, their versions, and OEM flavors (in case of Android). You'll have to handle all edge cases yourself.
Ignoring exceptions
If an exception is thrown during a test, it is marked as failed. This is Flutter's default behavior and it's usually good – after all, it's better to fix the cause of a problem instead of ignoring it.
That said, sometimes you do have a legitimate reason to ignore an exception. This can be accomplished with the help of the WidgetTester.takeException() method, which returns the last exception that occurred and removes it from the internal list of uncaught exceptions, so that it won't mark the test as failed. To use it, just call it once:
final widgetTester = $.tester;
widgetTester.takeException();
If more than a single exception is thrown during the test and you want to ignore all of them, the below snippet should come in handy:
var exceptionCount = 0;
dynamic exception = $.tester.takeException();
while (exception != null) {
  exceptionCount++;
  exception = $.tester.takeException();
}
if (exceptionCount != 0) {
  $.log('Warning: $exceptionCount exceptions were ignored');
}
Handling permission dialogs before the main app widget is pumped
Sometimes you might want to manually request permissions in the test before the main app widget is pumped. Let's say that you're using the geolocator package:
final permission = await Geolocator.requestPermission();
final position = await Geolocator.getCurrentPosition();
await $.pumpWidgetAndSettle(MyApp(position: position));
In such case, first call the requestPermission() method, but instead of
awaiting it, assign the Future it returns to some final. Then, use Patrol to
grant the permissions, and finally, await the Future from the first step:
// 1. request the permission
final permissionRequestFuture = Geolocator.requestPermission();
// 2. grant the permission using Patrol
await $.platform.mobile.grantPermissionWhenInUse();
// 3. wait for permission being granted
final permissionRequestResult = await permissionRequestFuture;
expect(permissionRequestResult, equals(LocationPermission.whileInUse));
final position = await Geolocator.getCurrentPosition();
await $.pumpWidgetAndSettle(MyApp(position: position));
See also: