

Getting started
Check out our video version of this tutorial on YouTube!
If you want to use Patrol finders in your existing widget or golden tests, go to Using Patrol finders in widget tests.
In this tutorial, we are using example app, which has package name
com.example.myapp on Android, bundle id com.example.MyApp on iOS,
com.example.macos.MyApp on macOS and My App name on all platforms.
Replace any occurences of those names with proper values.
Support for macOS is in alpha stage. Please be aware that some features may not work as expected. There is also no native automation support for macOS yet. If you encounter any issues, please report them on GitHub.
Add dependency on patrol
If you haven't already, add a dependency on the patrol package in the
dev_dependencies section of pubspec.yaml. patrol package requires
Android SDK version 21 or higher.
flutter pub add patrol --dev
Configure Patrol in pubspec.yaml
Create patrol section in your pubspec.yaml:
dependencies:
  # ...

dev_dependencies:
  # ...

patrol:
  app_name: My App
  android:
    package_name: com.example.myapp
  ios:
    bundle_id: com.example.MyApp
  macos:
    bundle_id: com.example.macos.MyApp
If you don't know where to get package_name and bundle_id from, see the FAQ section.
Install patrol_cli
Patrol CLI (command-line interface) is a small program that enables running
Patrol UI tests. It is necessary to run UI tests (flutter test won't work! Here's why).
-
Install
patrol_cliexecutable:dart pub global activate patrol_cli
Make sure to add patrol to your PATH environment variable.
It's explained how to do it in the README.
-
Verify that installation was successful and your environment is set up properly:
patrol doctorExample output:
Patrol CLI version: 2.3.1+1
Android:
• Program adb found in /Users/username/Library/Android/sdk/platform-tools/adb
• Env var $ANDROID_HOME set to /Users/username/Library/Android/sdk
iOS / macOS:
• Program xcodebuild found in /usr/bin/xcodebuild
• Program ideviceinstaller found in /opt/homebrew/bin/ideviceinstaller
Be sure that for the platform you want to run the test on, all the checks are green.
Patrol CLI invokes the Flutter CLI for certain commands. To override the command used,
pass the --flutter-command argument or set the PATROL_FLUTTER_COMMAND environment
variable. This supports FVM (by setting the value to fvm flutter), puro (puro flutter)
and potentially other version managers.
Integrate with native side
The 3 first steps were common across platforms. The rest is platform-specific.
Psst... Android is a bit easier to set up, so we recommend starting with it!
-
Go to android/app/src/androidTest/java/com/example/myapp/ in your project directory. If there are no such folders, create them. Remember to replace
/com/example/myapp/with the path created by your app's package name. -
Create a file named
MainActivityTest.javaand copy there the code below.
package com.example.myapp; // replace "com.example.myapp" with your app's package

import androidx.test.platform.app.InstrumentationRegistry;
import org.junit.Test;
import org.junit.runner.RunWith;
import org.junit.runners.Parameterized;
import org.junit.runners.Parameterized.Parameters;
import pl.leancode.patrol.PatrolJUnitRunner;

@RunWith(Parameterized.class)
public class MainActivityTest {
    @Parameters(name = "{0}")
    public static Object[] testCases() {
        PatrolJUnitRunner instrumentation = (PatrolJUnitRunner) InstrumentationRegistry.getInstrumentation();
        // replace "MainActivity.class" with "io.flutter.embedding.android.FlutterActivity.class"
        // if in AndroidManifest.xml in manifest/application/activity you have
        //     android:name="io.flutter.embedding.android.FlutterActivity"
        instrumentation.setUp(MainActivity.class);
        instrumentation.waitForPatrolAppService();
        return instrumentation.listDartTests();
    }

    public MainActivityTest(String dartTestName) {
        this.dartTestName = dartTestName;
    }

    private final String dartTestName;

    @Test
    public void runDartTest() {
        PatrolJUnitRunner instrumentation = (PatrolJUnitRunner) InstrumentationRegistry.getInstrumentation();
        instrumentation.runDartTest(dartTestName);
    }
}
-
Go to the build.gradle file, located in android/app folder in your project directory.
-
Add these 2 lines to the
defaultConfigsection:
  testInstrumentationRunner "pl.leancode.patrol.PatrolJUnitRunner"
  testInstrumentationRunnerArguments clearPackageData: "true"
- Add this section to the
androidsection:
  testOptions {
    execution "ANDROIDX_TEST_ORCHESTRATOR"
  }
- Add this line to
dependenciessection:
androidTestUtil "androidx.test:orchestrator:1.4.2"
Bear in mind that ProGuard can lead to some problems if not well configured, potentially causing issues such as ClassNotFoundExceptions.
Keep all the Patrol packages or disable ProGuard in android/app/build.gradle:
  ...
  buildTypes {
    release {
        ...
    }
    debug {
        minifyEnabled false
    }
  }
-
Open
ios/Runner.xcworkspacein Xcode. -
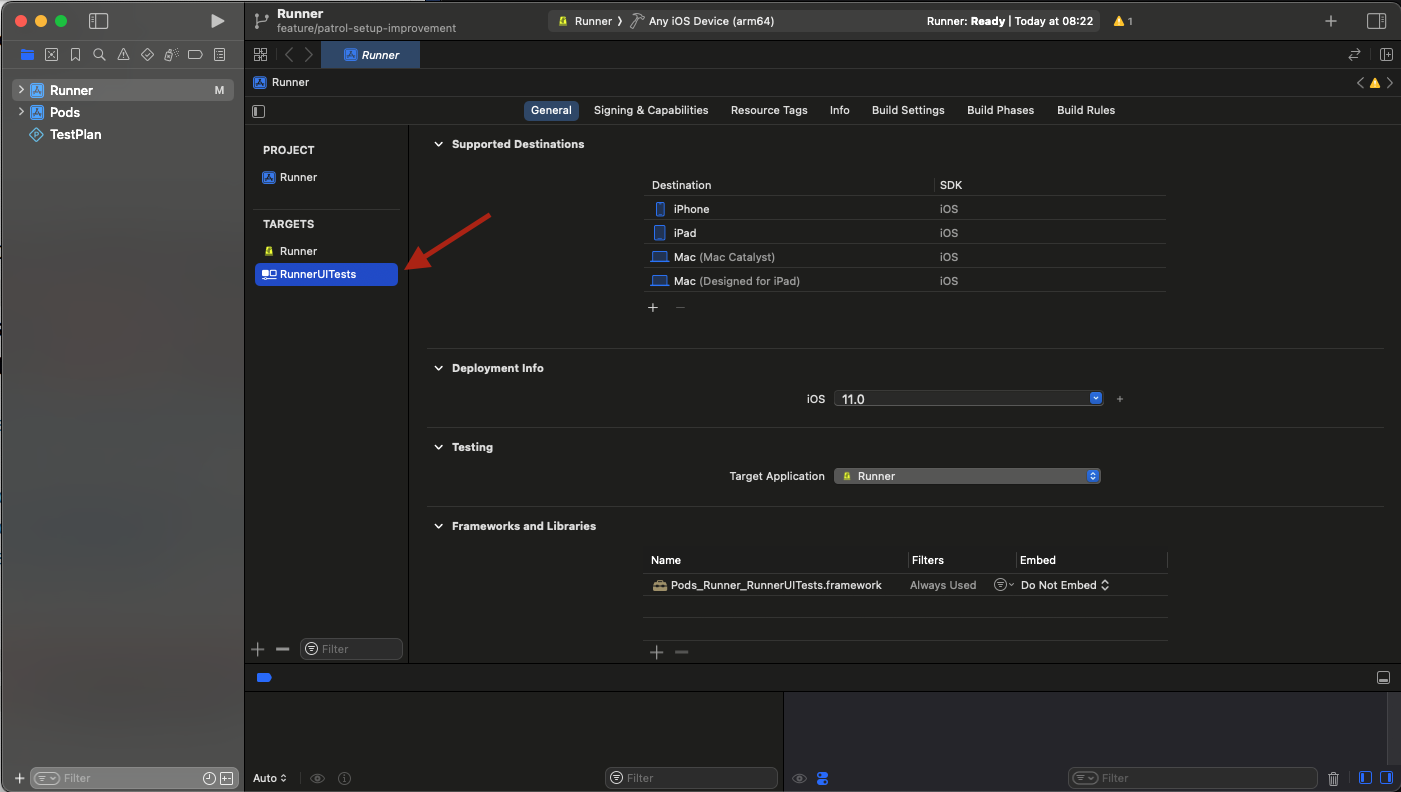
Create a test target if you do not already have one (see the screenshot below for the reference). Select
File > New > Target...and selectUI Testing Bundle. Change theProduct NametoRunnerUITests. Set theOrganization Identifierto be the same as for theRunner(no matter if you app has flavors or not). For our example app, it'scom.example.MyAppjust as in thepubspec.yamlfile. Make sureTarget to be Testedis set toRunnerand language is set toObjective-C. SelectFinish.
-
2 files are created:
RunnerUITests.mandRunnerUITestsLaunchTests.m. DeleteRunnerUITestsLaunchTests.mthrough Xcode by clicking on it and selectingMove to Trash. -
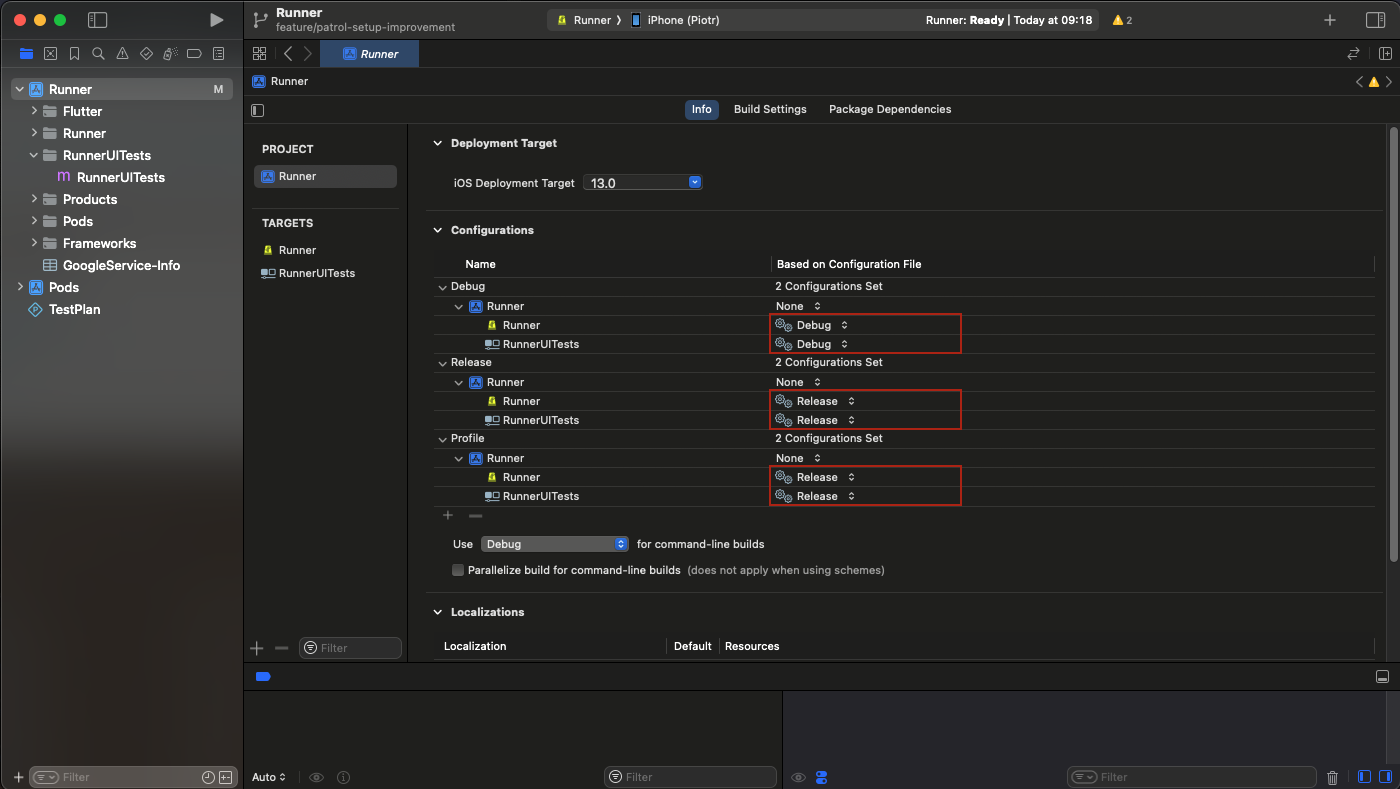
Make sure that the iOS Deployment Target of
RunnerUITestswithin the Build Settings section is the same asRunner. The minimum supported iOS Deployment Target is11.0. For the example app, we set it to13.0because it's required by the app dependencies.


- Replace contents of
RunnerUITests.mfile with the following:
@import XCTest;
@import patrol;
@import ObjectiveC.runtime;

PATROL_INTEGRATION_TEST_IOS_RUNNER(RunnerUITests)
Add the newly created target to ios/Podfile by embedding in the existing
Runner target.
target 'Runner' do
  # Do not change existing lines.
  ...

  target 'RunnerUITests' do
    inherit! :complete
  end
end
- Create an empty file
integration_test/example_test.dartin the root of your Flutter project. From the command line, run the following command and make sure it completes with no errors:
$ flutter build ios --config-only integration_test/example_test.dart
- Go to your
iosdirectory and run:
$ pod install --repo-update
- Open your Xcode project and Make sure that for each build configuration,
the
RunnerUITestshave the same Configuration Set selected as theRunner:
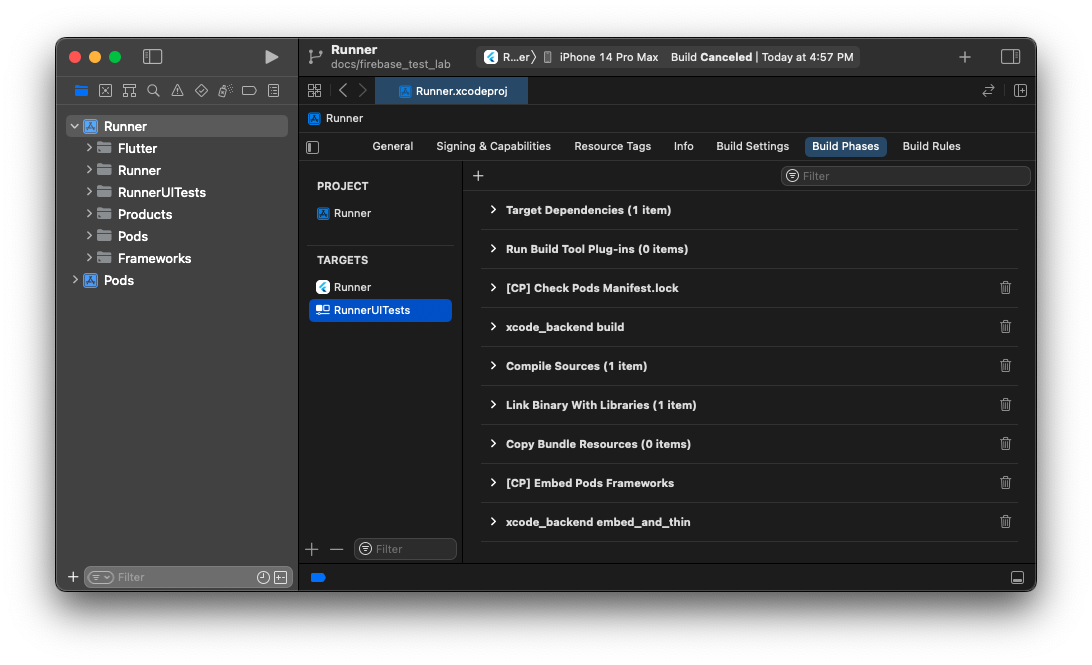
- Go to RunnerUITests -> Build Phases and add 2 new "Run Script Phase" Build Phases.
Name them
xcode_backend buildandxcode_backend embed_and_thin.
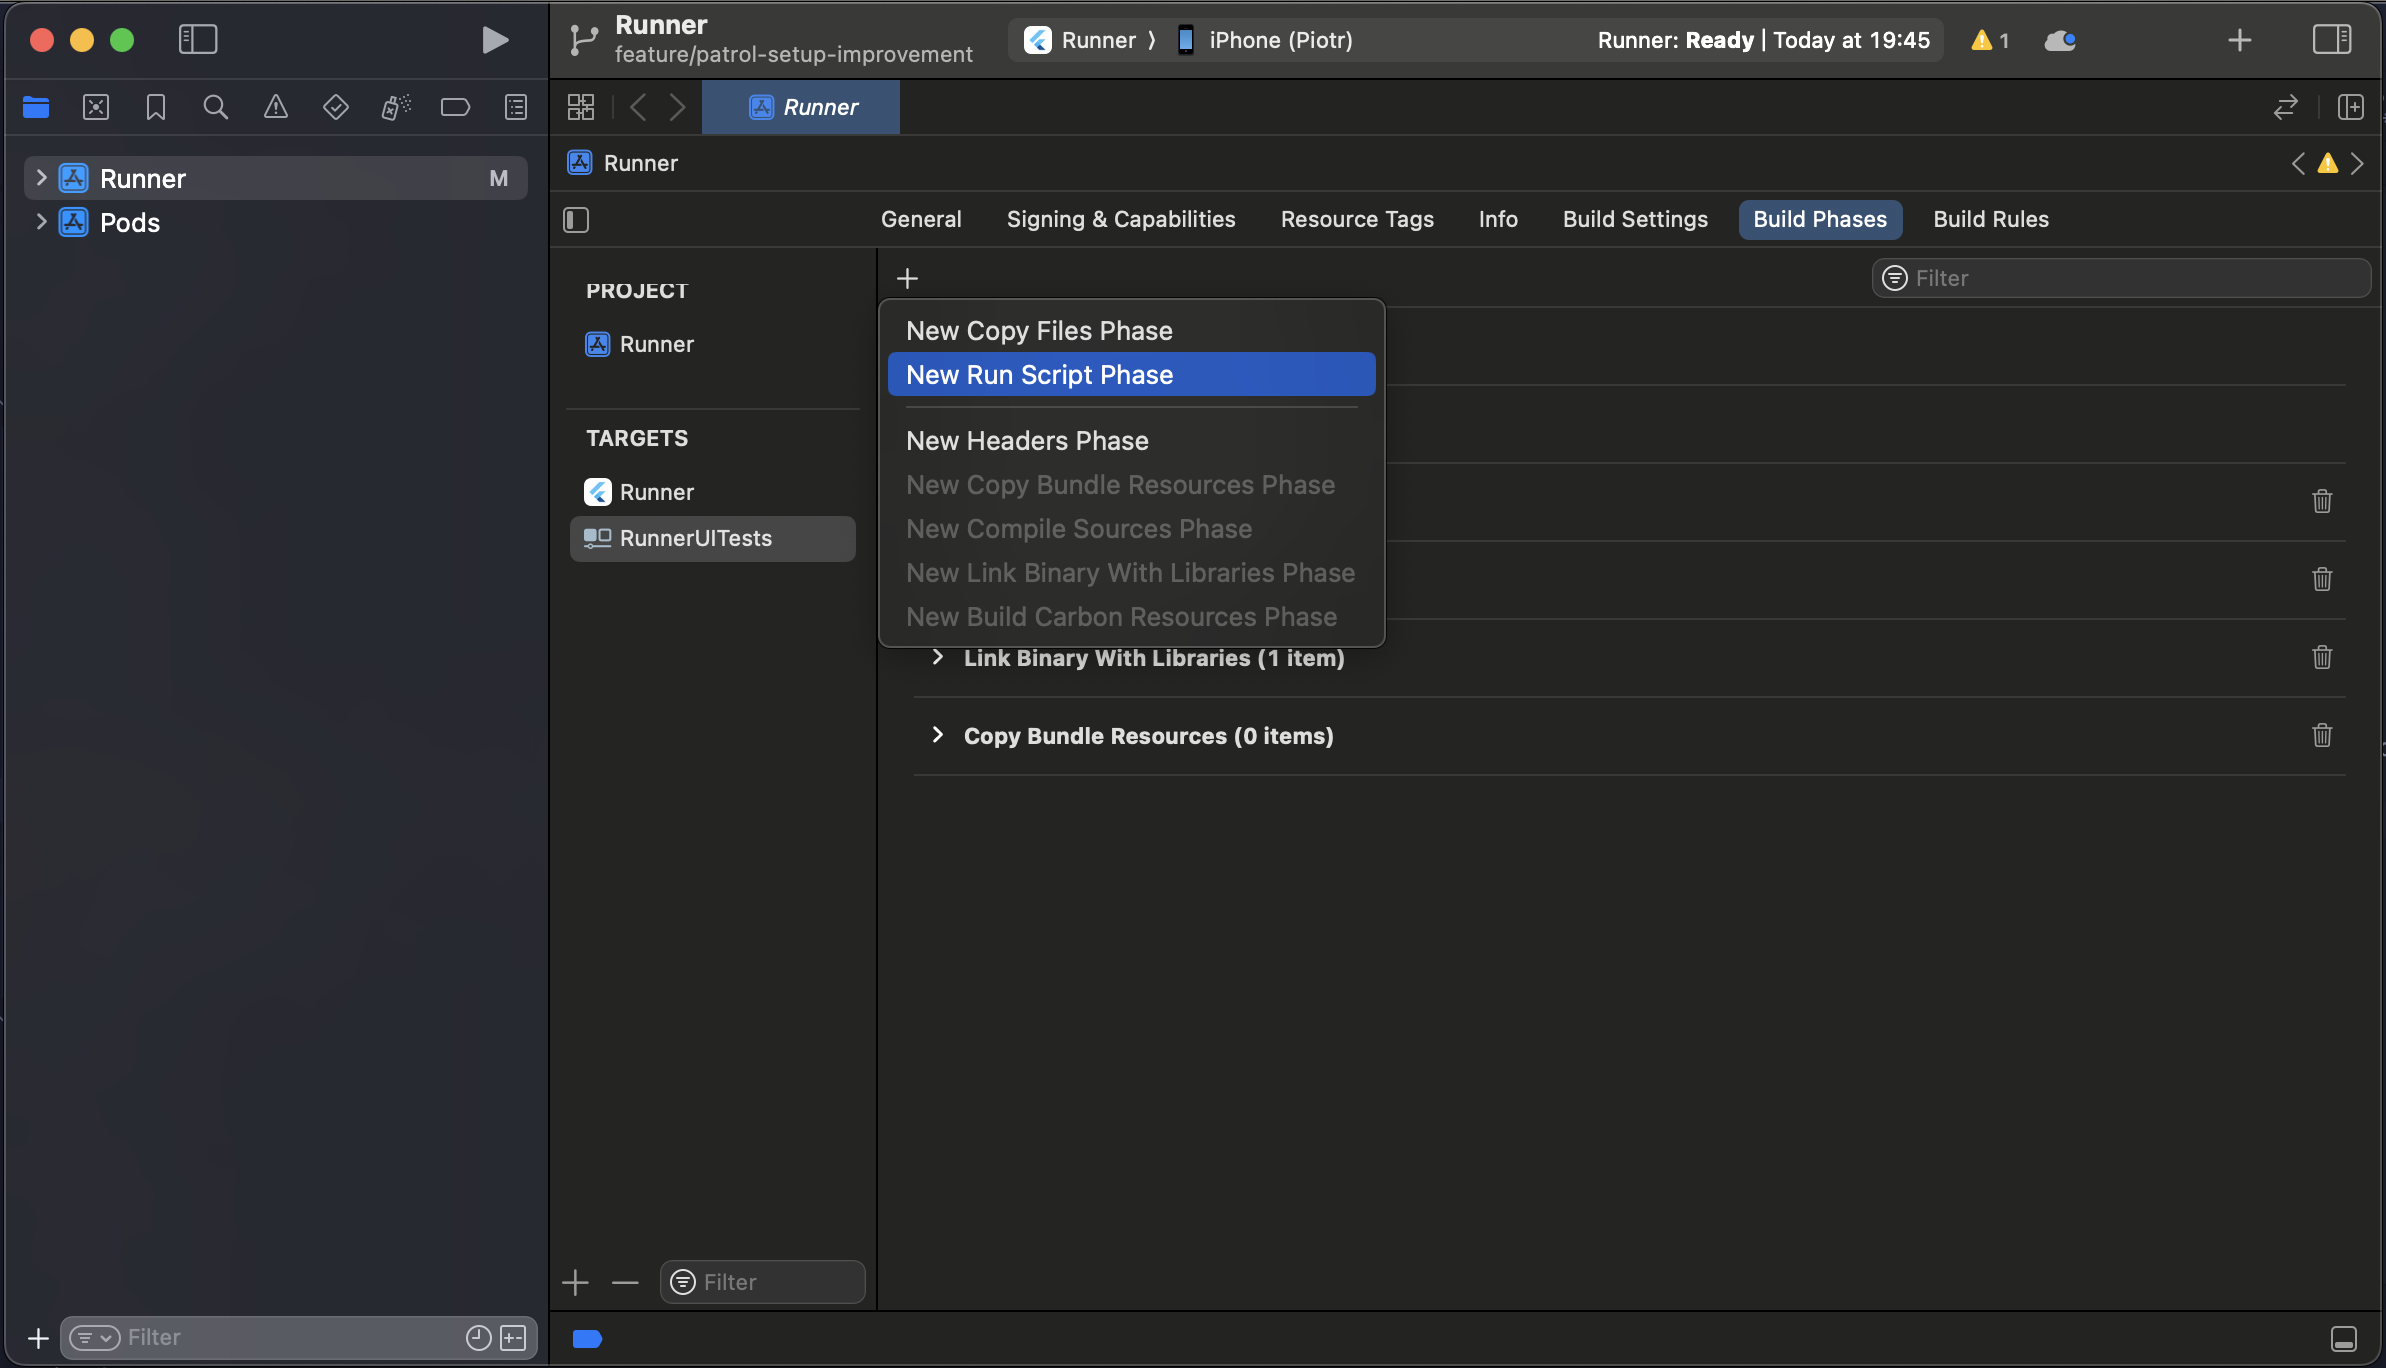
- Arrange the newly created Build Phases in the order shown in the screenshot below.
- Paste this code into the
xcode_backend buildBuild Phase:
/bin/sh "$FLUTTER_ROOT/packages/flutter_tools/bin/xcode_backend.sh" build
- Paste this code into the
xcode_backend embed_and_thinBuild Phase:
/bin/sh "$FLUTTER_ROOT/packages/flutter_tools/bin/xcode_backend.sh" embed_and_thin
- Xcode by default also enables a "parallel execution" setting, which breaks Patrol. Disable it for all schemes (if you have more than one):
- Go to RunnerUITests -> Build Settings, search for User Script Sandboxing and make sure it's set to No.
Create a simple integration test
Let's create a dummy Flutter integration test that you'll use to verify that Patrol is correctly set up.
Paste the following code into integration_test/example_test.dart:
import 'dart:io';

import 'package:flutter/material.dart';
import 'package:flutter_test/flutter_test.dart';
import 'package:patrol/patrol.dart';

void main() {
  patrolTest(
    'counter state is the same after going to home and switching apps',
    ($) async {
      // Replace later with your app's main widget
      await $.pumpWidgetAndSettle(
        MaterialApp(
          home: Scaffold(
            appBar: AppBar(title: const Text('app')),
            backgroundColor: Colors.blue,
          ),
        ),
      );

      expect($('app'), findsOneWidget);
      if (!Platform.isMacOS) {
        await $.native.pressHome();
      }
    },
  );
}
It does only 2 things:
- first, it finds a text
app - then (on mobile platforms), it exits to home screen
It's a very simple test, but it's enough to verify that Patrol is correctly set
up. To run integration_test/example_test.dart on a connected Android, iOS or macOS device:
patrol test -t integration_test/example_test.dart
If the setup is successful, you should see a TEST PASSED message. If something went wrong, please proceed to the FAQ section which might contain an answer to your issue.
If your app is using flavors, then you can pass them like so:
patrol test --target integration_test/example_test.dart --flavor development
or you can specify them in pubspec.yaml (recommended):
patrol:
  app_name: My App
  flavor: development
  android:
    package_name: com.example.myapp
  ios:
    bundle_id: com.example.MyApp
    app_name: The Awesome App
  macos:
    bundle_id: com.example.macos.MyApp
To prevent issues during Patrol tests, please follow these guidelines:
- Do not call
IntegrationTestWidgetsFlutterBinding.ensureInitialized. Patrol automatically initializes its own test binding. - Do not modify the global
FlutterError.onErrorcallback. Patrol's internals depend on it. Keep in mind that this callback can also be modified by popular packages such as Sentry or Crashlytics. In such cases, you can disable them for Patrol tests.
If you are looking for a working example of a Flutter app with Patrol tests, check out the example app in the patrol repository.
iOS
If you couldn't find an answer to your question/problem, feel free to ask on Patrol Discord Server.
Going from here
To learn how to write Patrol tests, see finders and native automation sections.